


Graffiti. It shows up overnight on the front wall of your shop, on the boundary wall of your house, on the side of a building. In the morning, it is just there — bold, unwanted, and embarrassing. For a lot of property owners across Lahore, Karachi, Islamabad, and smaller cities in between, this is not a once-in-a-while problem. It is a recurring headache that nobody planned for.
The default response in Pakistan is usually to grab whatever thinner is available, pour it on, and start scrubbing. Sometimes that works, partially. More often, it leaves behind a faded ghost of the original mark, a patchy surface, and the constant reminder that the wall still does not look right. Other times, people just paint over the whole wall without removing the graffiti first — which creates its own problems down the line as the old markings bleed through the new coat.
The truth is that to remove graffiti properly is not complicated, but it does require the right approach. And the right approach starts with understanding what you are actually dealing with.
Why Graffiti Is Harder to Remove Than It Looks
Graffiti is typically applied using aerosol spray paint, which is a solvent-based product that penetrates surfaces quickly and bonds tightly once it dries. Unlike regular wall paint that sits on the surface, spray paint sinks into the pores of brick, plaster, and concrete. That is exactly why a wet cloth or plain water does nothing, and why scrubbing too hard without a proper solution ends up damaging the surface texture before the paint even budges.
The surface type matters a great deal here. A smooth tile or metal surface is relatively forgiving — graffiti sits on top rather than soaking in. But brick walls, concrete blocks, rough plaster, and porous stone all absorb spray paint rapidly. On these surfaces, the longer the graffiti sits, the harder it becomes to remove completely. Acting quickly gives you a much better outcome.

What Actually Works: A Proper Graffiti Remover
A dedicated graffiti remover spray is formulated specifically to break down the chemical bonds in aerosol paint, lift the pigment away from the surface, and allow it to be wiped or washed off cleanly. This is fundamentally different from using general-purpose thinners or acetone, which can strip protective coatings, discolour surfaces, and still leave the graffiti pigment behind in many cases.
A good graffiti remover works through a process of chemical penetration followed by dissolution. You apply the product directly onto the affected area, give it a few minutes to work into the surface, and then either scrub it lightly with a brush or rinse it off with water. For thicker paint or layered applications, a second pass is usually enough. The formula essentially does the heavy lifting so that the scrubbing required is minimal, which reduces the risk of surface damage.
This is the kind of approach that works consistently — not just on spray paint, but also on alkyd, acrylic, vinyl, oil-based paint, cellulose paint, and even epoxy varnishes. That versatility matters, because in real situations you often do not know exactly what type of paint was used.
Step-by-Step: How to Remove Graffiti the Right Way
Step 1 — Assess the Surface
Before applying anything, look at what you are working with. Is it a painted wall, raw brick, concrete, metal sheeting, or a tiled surface? Is the graffiti fresh or has it been there for weeks? Fresh graffiti is always easier to remove. Knowing your surface type helps you decide how long to let the remover dwell and how much pressure to use when scrubbing.
Step 2 — Wear Proper Protective Gear
Even a low-toxicity graffiti remover should be used with basic precautions. Wear gloves to protect your hands. If you are working in an enclosed or poorly ventilated space, a simple face mask is a good idea. This is just responsible practice — these products are designed to be handled safely, but direct skin contact over time is not ideal.
Step 3 — Apply the Graffiti Remover Directly
Spray the graffiti remover directly onto the painted area, making sure to cover the entire mark. Do not be stingy with the coverage — the remover needs contact with the paint to start working. For vertical surfaces, apply from the bottom upward so the product does not run down below the treated area before it has a chance to work.
Step 4 — Allow Dwell Time
This is the step most people rush, and it is where a lot of DIY removal goes wrong. The dwell time — the time you leave the product sitting on the surface — is when the actual chemical work is happening. Most formulas need at least three to five minutes. For porous surfaces or older graffiti, give it longer. Patience here saves effort later.
Step 5 — Agitate and Remove
Use a stiff-bristled brush to agitate the softened paint in circular motions. On smooth surfaces, a cloth or sponge works well. You will see the paint start to lift and move around as you scrub. For very stubborn marks, reapply the remover and let it dwell again before scrubbing a second time.
Step 6 — Rinse Thoroughly
Once the graffiti has been lifted, rinse the area well with clean water. This step removes the dissolved paint residue and any remaining product from the surface. On large outdoor areas, a garden hose works fine. For smaller indoor or shop-front applications, a damp cloth or bucket of water is enough. Make sure the rinse is thorough — leftover residue can affect how any future paint coat adheres to the surface.
Tips for Different Surfaces Common in Pakistan
Brick and Plaster Walls
These are the most common surfaces affected by graffiti in Pakistani cities. Apply the remover generously, allow a longer dwell time, and use a medium-to-stiff brush. The porous nature of brick means you may need two passes for thorough removal. Rinsing with a decent volume of water helps flush pigment out of the pores.
Metal Gates, Shutters, and Fencing
Metal responds well to graffiti removers and generally cleans up faster than brick. The key thing to watch for is whether the metal has a protective coating or finish — aggressive scrubbing can scratch that finish even after the paint has been dissolved. Use a softer cloth after the initial chemical action and avoid steel wool.
Painted Boundary Walls
If the wall surface has an existing paint layer, test the remover in an inconspicuous area first. A good-quality remover at correct dwell time should lift the graffiti without disturbing a well-bonded underlying paint layer, but this depends on the type of base paint used. If any discolouration occurs in the test area, proceed more carefully with shorter dwell times.
Common Mistakes to Avoid
One of the most common errors is using solvent-heavy substitutes — petrol, kerosene, or paint thinner from general hardware stores — in the hope of cutting through the paint. These substances can work partially on fresh graffiti but they also strip whatever protective coating is on the wall, can create toxic fumes in poorly ventilated areas, and leave oily residue that prevents new paint from adhering properly. They are also not specific to graffiti chemistry.
Another mistake is repainting without removing the graffiti first. Paint-on-paint does not fully seal the old marks — especially if the wall colour is a lighter shade than the graffiti. Over time, the old paint bleeds through and the new coat starts showing patches. A proper removal before repainting gives you a genuinely clean surface to work with.
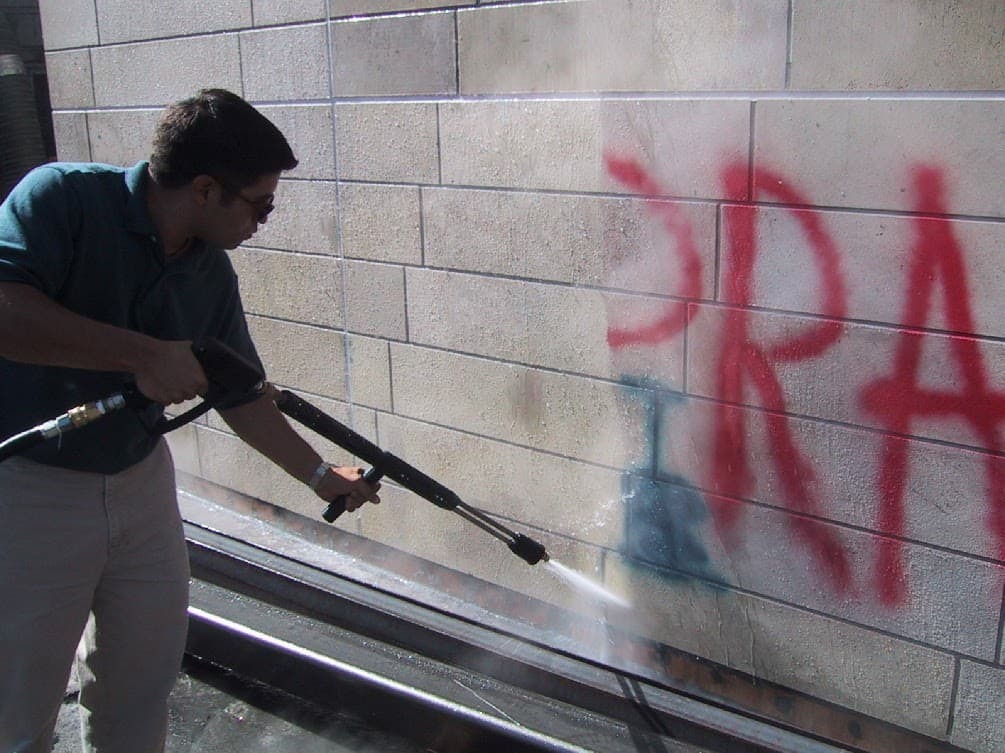
Finally, do not assume that pressure washing alone is sufficient. High-pressure water can shift loose or flaking paint, but it cannot break down the chemical bonds in aerosol graffiti paint. It works best as a rinse step after a chemical remover has done its job, not as the primary removal method.
When to Repeat the Process
Some graffiti — especially thick, multi-colour murals or old marks that have had months to cure — will not come off in a single pass. That is completely normal. The second application of a graffiti remover is usually more effective because the first pass has already broken into the paint structure. Allow the same dwell time, agitate again, and rinse. Most graffiti, even old and layered, comes off in two applications.
Keeping Walls Clean After Removal
After a clean removal, consider applying a protective clear coating or anti-graffiti barrier to walls that have been repeatedly targeted. These coatings create a surface that resists paint adhesion, making future graffiti much easier to remove — in some cases, a simple wipe-down is enough. This is particularly useful for shopfronts in commercial areas, boundary walls on main roads, and public-facing surfaces that are prone to repeated vandalism.
Graffiti is a problem that will not solve itself, and improvised removal methods create as many problems as they solve. With the right product and the right approach, any wall in Pakistan — brick, plaster, metal, concrete — can be restored properly without permanent damage to the surface underneath.


